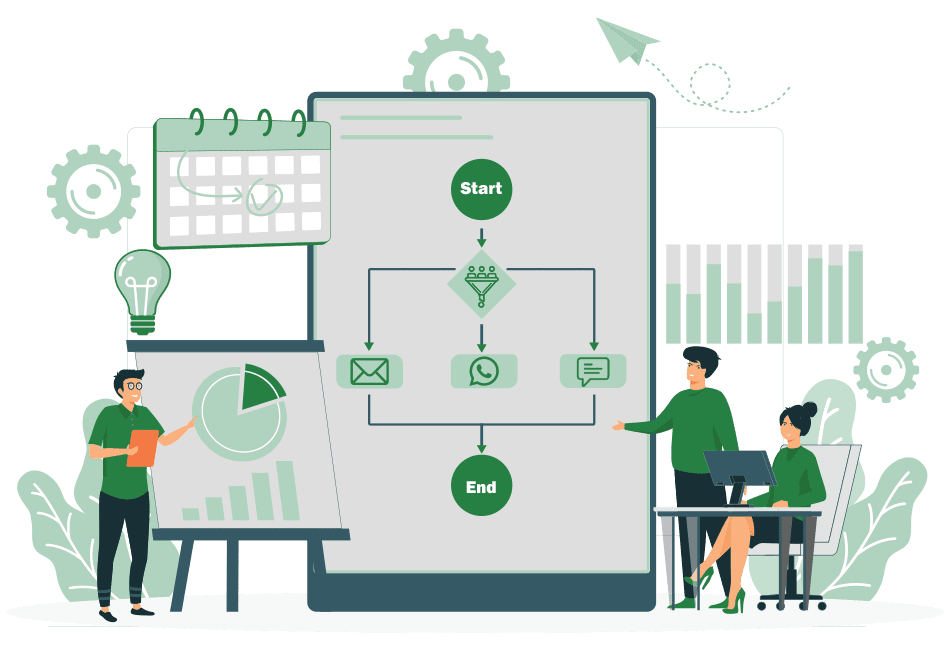
This system automates follow-up tasks and communications with various entities like leads, prospects, contacts, and invoices based on predefined triggers and conditions. It allows organizations to schedule a series of communications at specific intervals, such as sending emails or WhatsApp messages at key stages of a process, like when an entity is created, assigned, or updated. The workflow can be fully customized to trigger actions either before or after key events, repeat communications over a set number of days, and restrict automation to certain time frames. This feature helps streamline engagement, ensuring consistent and timely communication to improve outcomes.
We continue to expand the functionality, offering new options for applying automation across various business processes.

Configuring Marketing Automation
Marketing Automation Templates
These templates assist in automating messages, reminders, and follow-ups, ensuring consistent communication with different entities. The templates can be customized for various scenarios, such as welcoming prospects or sending payment reminders. By using these templates, businesses save time and reduce manual work, improving efficiency in managing processes and increasing the chances of successful outcomes.Accessing the Marketing Automation Template Module
To access the Marketing Automation Templates, go to the Setup of the module where you want to apply automation (e.g., Lead, Contact, or Prospect). Under the configuration options for that module, you will find an option for Automation Templates (e.g., Lead Automation Templates or Contact Automation Templates). Navigate to this section, and you’ll be able to add or manage templates for the selected module. The process is similar for all modules.
Field-Level Help
- Template Name: This field is where you specify the name or title of the template, representing its purpose. The name serves as an internal reference only and acts as an identifier within the system. It will not be visible to customers or recipients when the communication is sent.
Example- “Pharma CRM Campaign” - Email Subject: In this field, enter the subject line of the email that will be sent to the customer. This is the headline that the recipient will see when they receive the email, so ensure it is clear and engaging.
Example- “Overcoming Common Pharma Sales Challenges with H-Office CRM” - Email Body: This field is where you compose the content of your email. You can use the available editing and formatting options to customize the email body as needed. If you have a pre-designed HTML template, simply click on the “Source” button and paste your HTML code to incorporate your custom newsletter or design into the system.
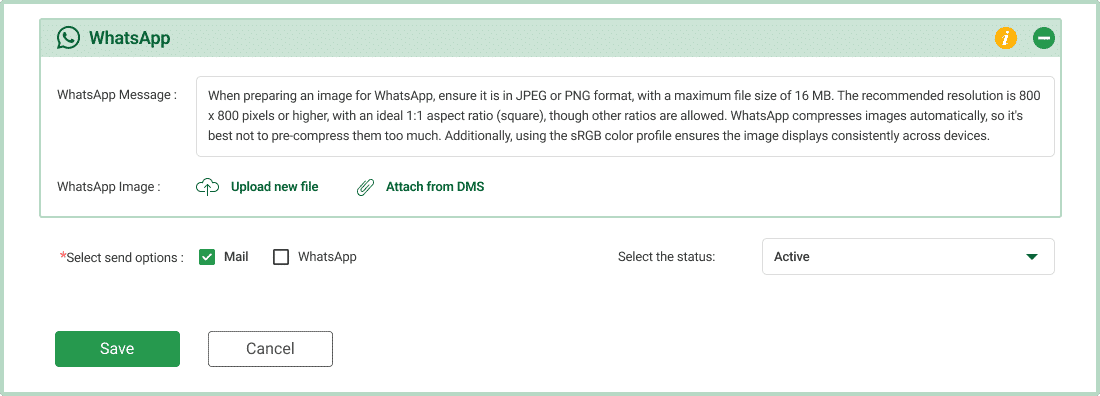
- WhatsApp Message: When preparing an image for WhatsApp, ensure it is in JPEG or PNG format, with a maximum file size of 16 MB. The recommended resolution is 800 x 800 pixels or higher, with an ideal 1:1 aspect ratio (square), though other ratios are allowed. WhatsApp compresses images automatically, so it’s best not to pre-compress them too much. Additionally, using the sRGB color profile ensures the image displays consistently across devices.
Example- Dear {name},
In the fast-paced realm of pharmaceutical sales, efficiency and precision are paramount. That’s why we’ve crafted a CRM solution to address challenges unique to pharmaceutical manufacturing and pharma job work companies.
Warm regards,
H-Office Team - WhatsApp Image: When preparing an image for WhatsApp, ensure it is in JPEG or PNG format, with a maximum file size of 16 MB. The recommended resolution is 800 x 800 pixels or higher, with an ideal 1:1 aspect ratio (square), though other ratios are allowed. WhatsApp compresses images automatically, so it’s best not to pre-compress them too much. Additionally, using the sRGB color profile ensures the image displays consistently across devices.
- Select the status: This dropdown determines whether the template is active (available for use in automation workflows) or inactive (not used in workflows).
- Active: When set to Active, the template can be used in lead follow-up workflows
- Inactive: If set to Inactive, it could be for two reasons: either the template is incomplete (e.g., the email message is ready but the WhatsApp message is not), or the workflow is no longer relevant and does not need to be triggered.
- Select send options: The field determines how the automated message will be delivered to the leads.
- Email: This option sends the automated message via email.
- WhatsApp:This option sends the automated message via WhatsApp. If you select both options, Email and WhatsApp, the communication will be sent through both mediums simultaneously.
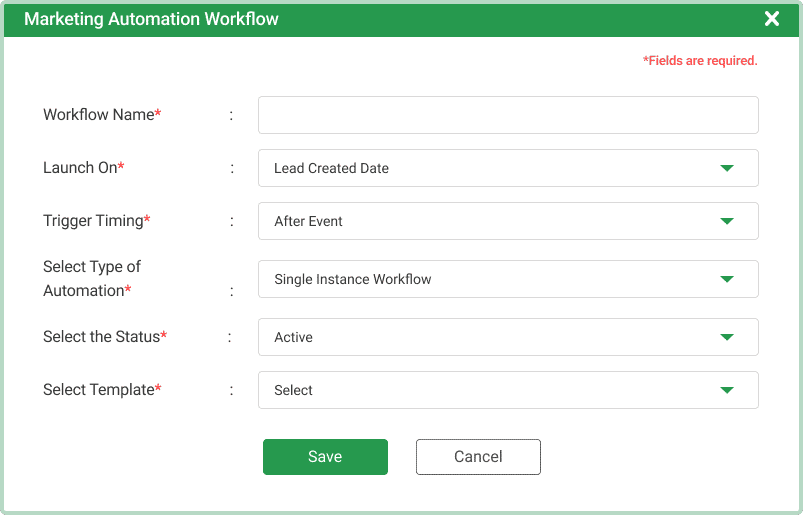
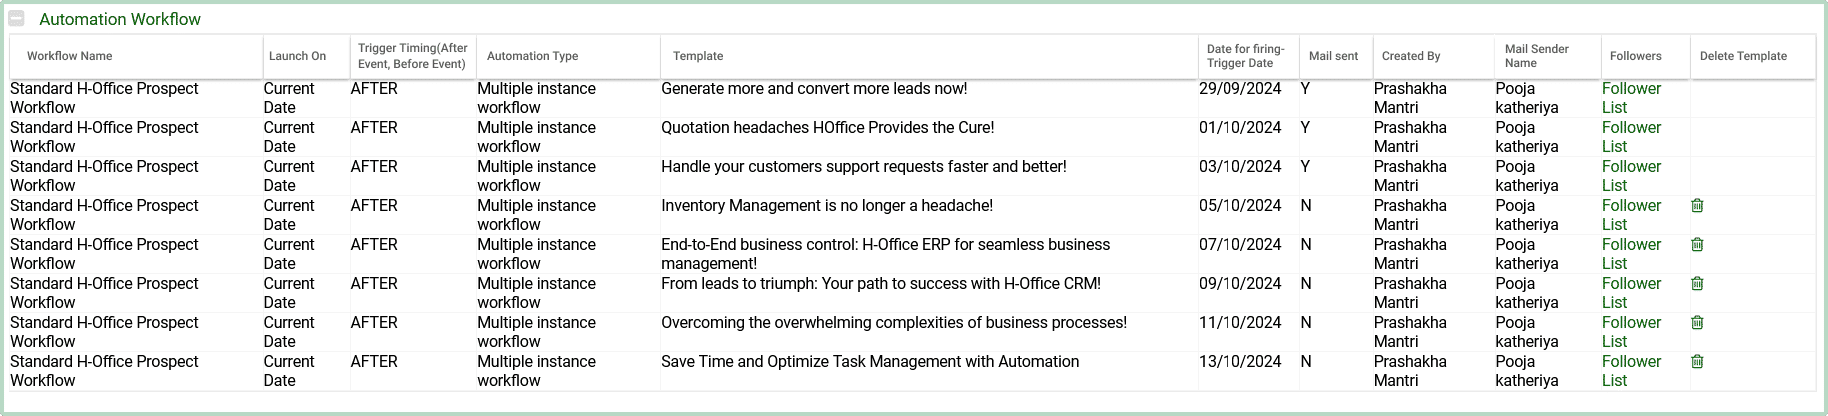
Accessing the Lead Automation Workflow Module
To add a new workflow, navigate to the Setup-> Lead-> Lead Automation Templates-> Click on the “Add” button to begin entering the details of a workflow into the system.
Field-Level Help
- Workflow Name: This field allows input of the name for the workflow so that it becomes easier while working on leads.
Example- “Pharma CRM Workflow” - Launch on: This field determines when the automation should be triggered based on lead-related events.
- Lead Created Date: This option triggers the automation based on the date the lead was created. The workflow will start according to the specified frequency from this date.
- Lead Assign Date: Selecting this option will initiate the automation based on the date the lead was assigned to a team member, with the workflow triggering according to the defined frequency from that date.
- Lead Won Date:This option activates the automation based on the date when the lead is marked as won, starting the workflow according to the set frequency from that date.
- Lead Lost Date: Choosing this option triggers the automation based on the date when the lead is marked as lost, initiating the workflow according to the specified frequency from that date.
- Current Date:This option starts the automation based on the current date, allowing the workflow to trigger immediately according to the defined frequency.
- Trigger Timing: The field controls the timing of when the automation will be triggered, relative to the event selected in the “Launch on” field.
- Before Event:Automation will be triggered a specified number of days before the selected date from the “Launch on” field.
This option is commonly used in scenarios where an action needs to happen before a critical event, such as a product expiration, support request due date, contract renewal or task deadline. It helps in sending reminders, notifications, or alerts ahead of the due date to ensure timely follow-up or action.
Example- “If a product is expiring in 3 days, a reminder email is sent before the expiration date.” - After Event:Automation will be triggered a specified number of days before the selected date from the “Launch on” field.
This option is commonly used in scenarios where an action needs to happen before a critical event, such as a product expiration, support request due date, contract renewal or task deadline. It helps in sending reminders, notifications, or alerts ahead of the due date to ensure timely follow-up or action.
Example- “If a product is expiring in 3 days, a reminder email is sent before the expiration date.”
- Before Event:Automation will be triggered a specified number of days before the selected date from the “Launch on” field.
This option is commonly used in scenarios where an action needs to happen before a critical event, such as a product expiration, support request due date, contract renewal or task deadline. It helps in sending reminders, notifications, or alerts ahead of the due date to ensure timely follow-up or action.
- Select Type of Automation: This field defines the type of automation in terms of its recurrence.
- Single Instance Workflow: The automation will run only once, ensuring no repeated actions.
Example- “A welcome message is sent to the customer once when the lead is created”- Before/After how many days do you want to send this message? Specify the number of days before or after the event when the communication should be sent.
Example: If set to “5 days before,” a reminder email will be sent five days before an scheduled event. If set to “2 days after,” a follow-up message will be sent two days after the event occurs.
- Before/After how many days do you want to send this message? Specify the number of days before or after the event when the communication should be sent.
- Multiple Instance Workflow: The automation will run multiple times, allowing for repeated triggers based on the defined conditions.
Example- “A follow-up email is sent every week for 4 weeks after the lead is created”- How many message templates do you want to send? Enter the number of message templates you wish to utilize for this workflow. This option is only available when you select the Multiple Instance Workflow. The templates will be sent at a set frequency via email, WhatsApp, or both, depending on your selections in the following fields.
Example- If you choose to use three message templates for a campaign, each template can be sent at a specified frequency to ensure varied communication with the customer. This allows you to engage the lead with different messages over time, enhancing automated communication effectiveness.
- How many message templates do you want to send? Enter the number of message templates you wish to utilize for this workflow. This option is only available when you select the Multiple Instance Workflow. The templates will be sent at a set frequency via email, WhatsApp, or both, depending on your selections in the following fields.
- Single Instance Workflow: The automation will run only once, ensuring no repeated actions.
- Select the status: The field controls whether the automation is operational or not.
- Active: The workflow is enabled and will trigger as per the defined conditions.
- Inactive: The workflow is disabled and will not trigger, even if the conditions are met
- Select Template: This field allows choosing a predefined template to be used in the automation.
Example- A template named “Effectively manage multiple leads” is selected, which sends an automated Email/WhatsApp.
Accessing the Automation Workflow Module
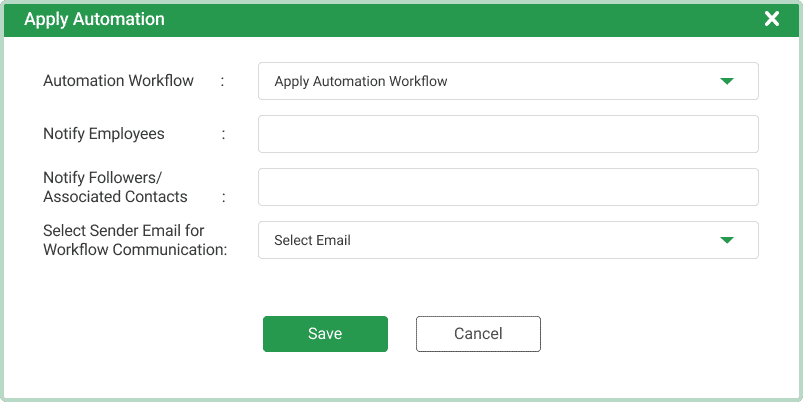
To access the Marketing Automation Workflow, go to the Setup of the module where you want to apply automation (e.g., Lead, Contact, or Prospect). Under the configuration options for that module, you will find an option for Automation Workflow (e.g., Lead Automation Templates or Contact Automation Templates). Navigate to this section, and you’ll be able to add or manage templates for the selected module. The process is similar for all modules.
- Automation Workflow: The field displays a list of available workflows. Select the appropriate workflow to be scheduled for automated execution based on predefined criteria or timing.
- Notify Employees: The selected employee will receive emails and WhatsApp messages triggered by the automation.
- Notify Followers/Associated Contacts: The field enables automation to be sent to all users following the transaction. This ensures that all relevant followers/associated contacts are notified or involved in the automation process.
- Select Sender Email for Workflow Communication: Choose the sender email ID to use for workflow communication.
- Official Email ID- Use the company’s official email address for workflow communication.
- Your Email ID- Use your own email address as the applicant of this workflow.
- Creator’s Email ID- Use the email ID of the person who created the transaction.