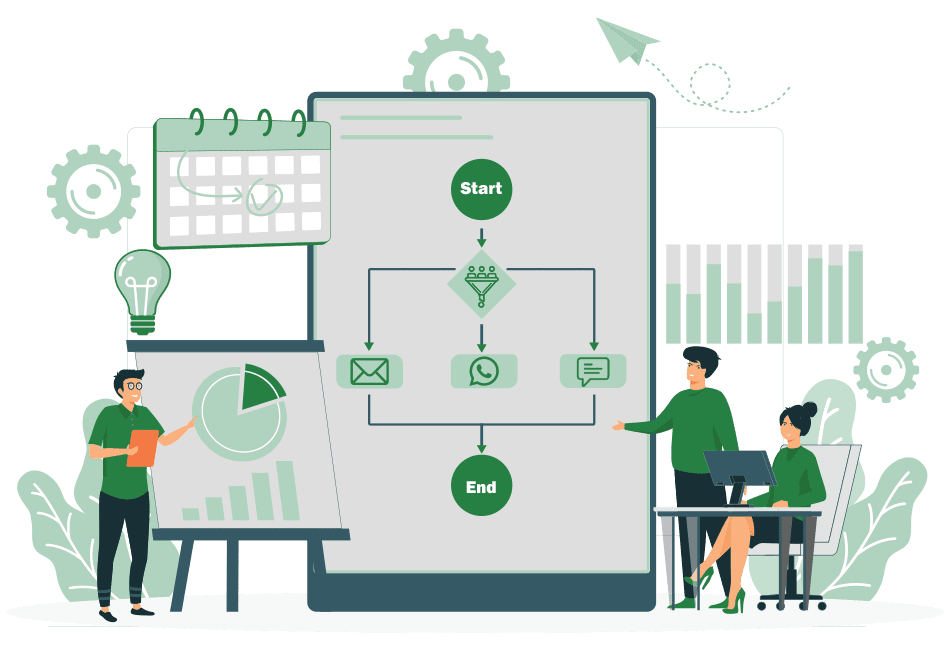
Access the Products
- Navigate to the Products Tab located next to the Dashboard in the top navigation menu
- Once you’re on the Product page, click on the “Add New Product” button to begin the process of adding
a new product to your H-Office CRM.

Add New Products
Follow the steps below and refer to the screenshot for guidance.

- Products Type: This field specifies the broad category or classification of the product, such as Assembly, Manufactured, Kitset. Select the type of the product from the dropdown list.
In H-Office, different product types cater to various business needs and scenarios. Understanding these product types and their appropriate use cases is crucial for effective inventory and sales management. The six primary product types available in H-Office: Assembly, Manufactured, Kit Set, Purchase, Dummy Goods, and Service with/without unit.For additional details on product types, refer to the link provided below https://hofficecrm.com/product-types-guide/- Assembly Products- These products are created by combining multiple components into a single virtual product. Only the finished product is visible in sales transactions, while the components are mentioned in the product description.
Examples: Custom-built computer, ready-to-assemble furniture, home theater system. - Manufactured Products- Manufactured products are finished goods produced through a manufacturing process. Inventory for raw materials and the final product is tracked, but details of the bill of materials are hidden in sales transactions.
Examples: Cars, clothing, industrial machinery. - Kit Set Products- Kit Set products combine multiple items into a single offering but display each included item as separate line items in sales orders.
Examples: Gift baskets, DIY tool kits, science experiment kits. - Purchase Products-These are products bought for resale in their original form, with no modifications or assembly involved.
Examples: Retail goods, office supplies, books. - Dummy Goods-Dummy Goods are non-saleable items used for inventory tracking purposes only, without financial or sales transactions.
Examples: Promotional items, office supplies, test samples. - Service with/without Unit-Service with Unit involves selling services that are billed based on quantifiable units like hours or visits. Service without Unit covers intangible services without measurable units.
Examples with Unit: Consulting services, maintenance visits.
Examples without Unit: Software support contracts, subscriptions.
By selecting the appropriate product type, businesses can better manage inventory and sales, ensuring accurate tracking and streamlined operations. Each type serves a specific operational need.
- Assembly Products- These products are created by combining multiple components into a single virtual product. Only the finished product is visible in sales transactions, while the components are mentioned in the product description.
- Product Name: Enter the actual product name as recognized by your business. This name will serve as the primary identifier for searching and managing the product across the system.
Example: Electric Motor, Running Shoes, or Smartphone. - Product Category: The product category field allows you to group products into relevant categories and subcategories, helping to organize and streamline your product catalog. These categories play an essential role in making product searches more efficient, applying attribute settings, and managing inventory. By creating a flexible tree structure, you can define categories such as “Electronics” or “Office Supplies” and assign products under them. This structure makes it easy to navigate through the catalog and segment different types of products, such as raw materials and finished goods.
Product categories also enable you to configure specific settings for groups of products, whether for internal management or external web settings, such as selling products online. With the ability to create unlimited categories, the system adapts to your business needs, ensuring accurate inventory tracking, easy searchability, and smooth online configuration.
Example: A product like a “Circuit Breaker” would fall under the “Electrical Equipment” category. - Product Code: The product code uniquely identifies each product in the system and is used for tracking, searching, and managing products across various processes like orders, inventory, and reporting. You can either manually input a code or use one of the available automatic generation methods. The product code ensures that each product is distinct, facilitating smooth operations and accurate data management.
- Manual- You can create and enter the code by your own
- Auto- The system automatically generates the code
- Category Based- The code is generated based on the product category
- Attribute Based- The code is generated according to specific attributes or characteristics of the product, such as size or color.
- HSN/SAC Code: Enter the HSN/SAC code of the product. The HSN (Harmonized System of Nomenclature) or SAC (Service Accounting Code) is a classification system used for identifying goods and services for taxation and regulatory purposes. It helps streamline the calculation of GST and compliance with government regulations.
Example: “8501” for electric motors. - Standard Unit: This field specifies the primary measurement used to standardize how the product is quantified and sold. Either select the unit from the dropdown menu or add a new unit.
Example: A bottle of olive oil is sold in liters, which standardizes how it is measured and sold. - Enable Decimals Points: Indicates if decimal points are allowed in the product’s quantity. If “Yes,” you can use the field “Allow Products Decimals Point”; if “No,” only whole numbers are used.
- Sales Rate: Enter the standard sales rate for the product. This rate will be automatically applied to sales transactions, including quotations, sales orders, and invoices. Ensure that the rate reflects the actual selling price to maintain consistency across all sales documentation.
- Product Classification: This field specifies the intended use of the product within the organization.
- Accessories: Use this classification for supplementary items that enhance or support the main product.
- Parts: Choose this classification for individual components or items that are used in assembly or manufacturing.
- Projects: Use this for specific undertakings or initiatives that involve multiple products or services combined.
- Raw Materials: Select this for unprocessed inputs that are used in the production of finished goods.
- Semi-finished Goods: Choose this for products that are partially completed and require further processing before they can be sold.
- Service: Use this classification for intangible offerings that involve providing a service rather than a physical product.
- Private Product (Admin-Only Access): Enable this setting to restrict product access to admin users only. This setting overrides the public/private visibility options and ensures that only admins can view and manage sensitive product details, such as secret ingredients or proprietary information.
Example: For a product containing a confidential formula, check this box to prevent regular users from accessing or viewing the product details. Only users with admin rights will have full access. - Privacy: Choose between public (all employees) or private (select specific employees). For private products, use the pop-up to select employees, filter by branch, or choose an employee group for faster selection.
- Product Account Type:
- Business:Indicates that the product is used for business operations or resale. It is crucial for tracking sales, revenue, and inventory.
- Expense: Used for products that are considered expenses, such as office supplies or maintenance items. These are tracked for financial accounting and budgeting purposes.
- Asset: Refers to products that are long-term investments or resources owned by the organization, used over multiple periods.
- All: This option means the product can be used in any of the categories like business, expense, or asset.
- Example: A computer could be recorded as an asset if it’s used for years, an expense if it’s bought for a specific project, or part of business operations if it’s resold.
- Product Division: Choose the division under which this product falls. The selected division can be used for applying discounts based on the product division and contact class combination. This selection is also used in BOMs and BOQs for line-item discounts.
- Example 1:For a product in Division A, if Class A clients are eligible for a 10% discount, select Division A. When creating a transaction for a Class A client, the discount will automatically apply.
- Example 2: In a BOM, if products under Division B have a 5% bulk order discount, selecting Division B ensures the discount is applied automatically.
- Product Alias Name: Enter alternative names or codes for the product, which can be used to reference the product differently across various documents. This is useful when the same product needs to be referred to by different names or identifiers for customers, vendors, or internal use. The alias will be used in documents such as quotations, invoices, purchase orders, and more, based on the context.
Example:
For a product like “ABC Widget,” you could have the following aliases:
Customer Name: “Premium Widget”
Internal Code: “Widget-123”
Vendor Name: “Supplier Widget” - Product Short Description: Enter a brief description of the product. This description will be automatically fetched and displayed in sales and purchase transactions such as quotations, invoices, orders, and purchase orders.
Example: For a product like “Wireless Mouse,” the short description could be: “Compact wireless mouse with ergonomic design, 2.4 GHz connectivity.” This description will appear in relevant transaction documents like quotes and invoices.

- MRP/RSP Price: Provide the Maximum Retail Price (MRP) for the product, which includes applicable taxes. This is the highest price at which the product can be sold to consumers. Additionally, enter the Recommended Retail Selling Price (RRSP) to guide retailers on suggested pricing. Both rates help maintain transparency and consistency in product pricing.
- Purchase Rate:Input the purchase rate for the product here. This rate will be used in purchasing transactions, ensuring accurate calculations for costs and inventory management. The purchase rate should reflect the actual cost price of acquiring the product.
- Currency ISO Code: This field indicates the ISO code of the currency in which the product’s prices are listed, such as “INR” for Indian Rupees. It ensures clarity in financial transactions.
- Division for Discounting: A business division represents a department or section within the same organization, where divisions may have different employees and responsibilities. When adding a product, it is assigned to a specific division, allowing for clearer management.
Example: A product like “Laptop” could be assigned to the “Electronics Division” while “Office Chairs” might belong to the “Furniture Division,” even though both are under the same company.
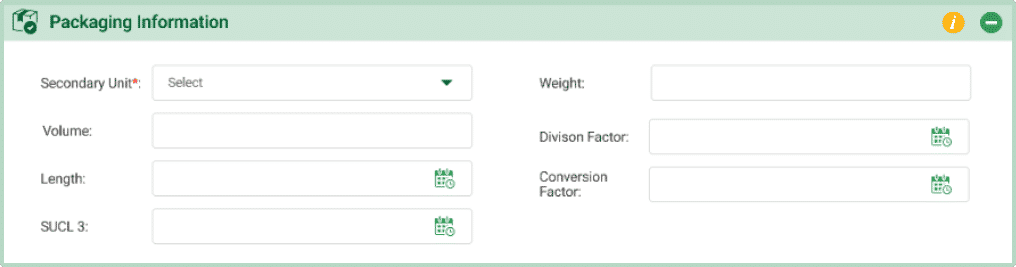
- Secondary Unit:The field is used to define an additional unit that represents the packaging or another form of measurement associated with the product.
Example: The olive oil is packed in boxes containing bottles, where “box” is the secondary unit. - Weight:This field specifies the weight of the product. It is important for shipping, handling, and inventory purposes.
- Volume: This field specifies the volume of the product. It helps in understanding the space the product occupies, which is crucial for storage and transportation.
- Custom Fields for Volume Calculation: This field calculates the total packaging volume based on values entered in custom fields. You can define multiple fields (e.g., Length, Width, Height) and enter their integer values. The final volume is calculated automatically using the defined formula from the custom fields.
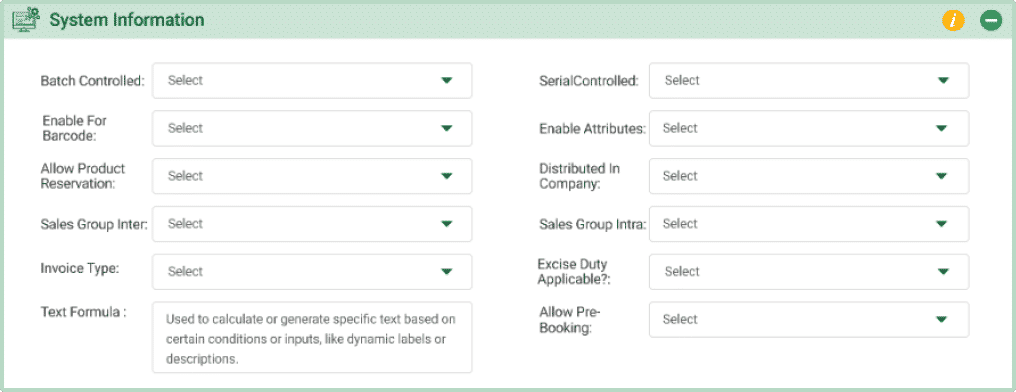
- Batch Controlled:Determines if the product is tracked by batch numbers, which helps in managing inventory and quality control. Select either “Yes” or “No” from the dropdown menu. On selection of yes, the field “serialized” appears
- Serial: This means each item has a unique serial number, allowing you to track and identify each individual product separately.
Example: The olive oil is packed in boxes containing bottles, where “box” is the secondary unit.
- Serial: This means each item has a unique serial number, allowing you to track and identify each individual product separately.
- Enable For Barcode:Indicates if the product can be assigned and tracked using barcodes. On selection of “Yes”, a new field called Type of Barcode appears which includes-
- System-Generated Barcode: Select this option to have the system automatically generate a unique barcode for each product. The barcode will be used for tracking and processing within the system.
- Pre-existing Product Barcode: Select this option if the product already has a barcode. The system will use the existing barcode for further tracking and processing.
- Enable Attributes: Determines if additional attributes or specifications can be assigned to the product. If “Yes,” you can add detailed attributes; if “No,” only basic information is used.
Example: If you have enabled 2 decimal points for quantities, then values like 5.75 or 12.50 can be entered.
For instance, if you’re selling a product by weight and a customer purchases 2.75 kg, the system will accurately capture the quantity with two decimal places enabled. This ensures precise tracking and billing. - Allow Product Reservation: Select either “Yes” or “No” from dropdown
- Yes: Indicates the product is utilized in the production process, either as a raw material, component, or tool necessary for manufacturing goods.
- No: Indicates the product is not used in the production process and may serve other purposes like administrative functions or direct sales.
- Distributed in Company: This field allows you to define which companies within your office can access this product during transactions. Employees with permissions for the selected companies will be able to view and transact with this product.
Example: If you select “Company A” and “Company B,” employees from these companies can view and sell this product. However, employees from “Company C” will not have access to this product during transactions. - Sales Group Inter: Select the tax group applicable for sales made across state boundaries (interstate sales). This group determines the applicable tax rates for transactions involving customers located outside the seller’s state.
Example: If you are selling a product from Gujarat to a customer in Maharashtra, select the applicable interstate tax group to calculate the correct IGST (Integrated Goods and Services Tax). - Sales Group Intra: Select the tax group applicable for sales made within the same state (intrastate sales). This group determines the tax rates, such as CGST (Central GST) and SGST (State GST), for transactions within the seller’s state.
Example: If you are selling a product to a customer within Gujarat, select the intrastate tax group to apply the correct CGST and SGST rates for the transaction. - Invoice Type: The format or type of invoice to be generated when the product is sold online, such as retail invoice, tax invoice.
Example: Tax Invoice for sales transactions - Excise Duty Applicable?Select “Yes” if excise duty is applicable to this product. Select “No” if the product is exempt from excise duty.
Example: If the product is a luxury item and subject to excise duty, select “Yes.” If the product is exempt from such duties (e.g., essential goods), select “No.” - Text Formula: Used to calculate or generate specific text based on certain conditions or inputs, like dynamic labels or descriptions.
- Allow Pre-Booking: Choose “Yes” or “No” to allow customers to book or pre-order the product before it is available for immediate delivery.

- Active For Sales:This field specifies whether the product is available for sale. If set to “Yes,” the product can be sold; if “No,” it is not listed for sales transactions.
Example: If a product is marked “Yes” under “Active For Sales,” it means that the product, such as a new smartphone model, is available and can be included in sales orders. - Active For Support:This field specifies whether the product is eligible for customer support or service. If set to “Yes,” it includes support options; if “No,” it does not.
Example: If you sell a software program, you might set this to “Yes” to provide tech support for installation and troubleshooting. - Active For Purchase: Determines if the product is available for purchase from suppliers. If “Yes,” you can order it; if “No,” purchasing is restricted.
 Warranty Included? This field indicates the duration or terms of the protection provided for the product against defects or issues after purchase. Select “Yes” or “No” to specify whether a warranty is offered with the product. On selection of “Yes”
- Customer Warranty (In Months): This shows the number of months the product is covered by warranty for the customer.
- Vendor Warranty (In Months): This indicates the number of months the manufacturer or vendor provides warranty coverage.
Example: For a smartphone, 24 months, meaning the customer gets 2 years of warranty coverage.12 months, indicating that the manufacturer covers the product for the first year.
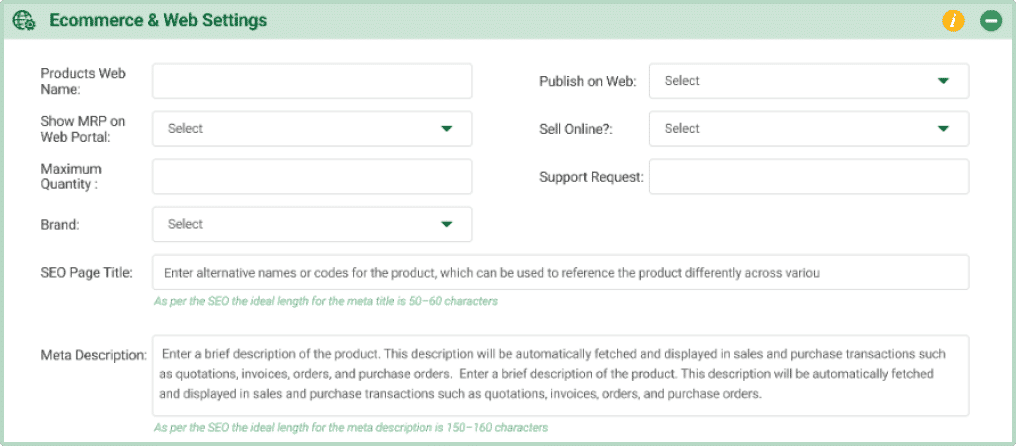
- Product Web Name: The name of the product that will appear on the website. It’s how customers will see and recognize the product online.
- Publish on Web: Choose “Yes” or “No” to decide if the product should be made visible and available for sale or display on your website.
- Show MRP on Web Portal: Select “Yes” or “No” to determine if the Maximum Retail Price (MRP) should be displayed on the portal.
- Sell Online? Choose “Yes” or “No” to specify if the product is available for purchase through your online store.
- Maximum Quantity: This sets the limit on how many units of the product a customer can buy in a single order online.
Example: Maximum of 3 TVs per order - Support Request: The field determines if support requests should be linked to the product rather than the event it’s associated with. Even if the product is mapped to an event, support will be provided based on the product, not the event.
Example: For a software subscription, if “Supportreq” is set to “Yes,” any support requests will be linked directly to the specific software product rather than the training event it was used for. This ensures that support is focused on the software itself, regardless of when or where it was used. - Brand: Select a brand to associate with this product. You can create and manage brands in the Brand Master within Product Setup. Mapping a brand allows you to search for products by brand and enables brand-wise categorization on the e-commerce portal.
Example: If you create a brand called “EcoSmart,” you can map it to relevant products. This allows customers to easily find all products under the “EcoSmart” brand when browsing the e-commerce portal. - SEO Page Title: Enter an SEO-friendly title for the product page to improve search engine rankings and visibility.
- Meta Description: Provide a brief, keyword-rich summary of the product to display in search engine results, attracting potential customers.

- Sales Tolerance (%): This allows a small percentage of variation in the quantity of a product sold compared to what was ordered.
Example: If set to 5%, the seller can deliver up to 5% more or less than the ordered amount. - Purchase Tolerance (%):This allows a small percentage of variation in the quantity of a product received compared to what was ordered.
Example: If set to 3%, the buyer can accept up to 3% more or less than the ordered amount.