Remember
- The complete Contact Center and all other modules and functionalities of H-Office are
interconnected with each other. You can view and perform all actions of the modules that are
enabled in your account right from the contact screen itself, those that are associated with the
particular contact.
- In the Contact Center, you can save both individual and company contacts. Please do use the
"Prospects" feature under the Marketing module for raw contacts or those who haven't done
business with you yet. Contact Center ideally is an exclusive section for accounting contacts.
Remember
- The complete Contact Center and all other modules and functionalities of H-Office are interconnected with each other. You can view and perform all actions of the modules that are enabled in your account right from the contact screen itself, those that are associated with the particular contact.
- In the Contact Center, you can save both individual and company contacts. Please do use the "Prospects" feature under the Marketing module for raw contacts or those who haven't done business with you yet. Contact Center ideally is an exclusive section for accounting contacts.
Access the Contact Center
- Navigate to the Contacts Tab located next to the Dashboard in the top navigation menu
- Once you’re on the Contacts page, click on the “Add New Contact” button to begin the process of adding a new contact to your H-Office CRM.

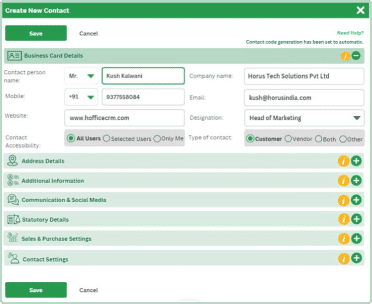
Adding Business Card Details
In this section, you can input essential information about your contacts, making it easier to manage and engage with them effectively. Follow the steps below and refer to the screenshot for guidance.
-
- Salutation & Contact Person Name: Select the appropriate salutation (e.g., Mr., Mrs., Dr.) from the dropdown list and enter the contact person’s full name.
- Company Name: Enter the name of the contact’s company or organization.
- Mobile: Input the correct contact’s mobile phone number along with your country code.
- Email: Add the correct email address associated with the contact.
- Website: If available, provide the website URL of the contact’s business.
- Designation: Enter the contact person’s job title or designation, if applicable.
- Type of Contact: Choose the type of contact from the options provided: Customer, Vendor, Both (if applicable), or Others. “Others” category typically includes contact types that don’t fit neatly into the predefined options of “Customer” or “Vendor.” Some examples are Business Consultants, Government Agencies, Media Contacts, Friends etc.
- Contact Accessibility: Specify who can access this contact information from the organization: Only Me, All Users, or Selected Users. This controls who can view and edit the contact details.
By following these steps, you can efficiently input the Business Card details for the contact in H-Office Contact Center.
Remember
- If you have only company / business contact details and not the individual details, you can keep the contact person name blank to save the contact and same way if you know only contact person name and unaware of their business name, you can keep the company name field blank.
- If you don't find a specific designation or salutation in the list that you want to add for the contact,please contact the system administrator to have the options added to the dropdown.
Adding Primary Address Details
In this section, you can input the primary address information for your contacts. This information isessential for accurate communication and record-keeping. Follow the steps below to add primaryaddress details: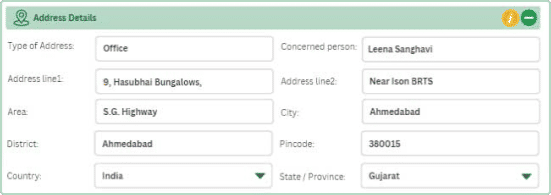
- Type of Address: Type the type of address in the text box. Common options include “Head Office,””Factory,” or “Warehouse.” Type the one that best suits the contact’s primary address.
- Concerned Person: By default, the concerned person for this address will be the same person whose contact information you are currently adding. If this address belongs to a different individual, you can specify their name here. And remember the name you add here will be printed on labels and envelops.
- Address Line 1: Enter the primary address, including street number, name, and any additional address details in this field.
- Address Line 2: If necessary, provide additional address information in this field, such as apartment or suite numbers.
- Area: Specify the locality or area where the address is located.
- City: Enter the city where the address is situated.
- District: If applicable, input the district or region associated with the address.
- Pincode: Provide the postal code or PIN code for the address.
- Country: Select the country where the address is located from the dropdown list.
- State / Province: Choose the state or province within the selected country from the dropdown list.
By following these steps, you can accurately capture the primary address details for your contacts in H-Office Contact Center.
Remember
- The name you add in the 'Concerned Person' field in the address section will be printed on labels and envelopes by default when printing them from the system.
- If you don't find a State or Country in the dropdown, please contact your system administrator to have it added.
- The 'City' field is a text-based dropdown. Type the city name correctly in the field, wait for a moment, and if the name appears in the dropdown, it means the city you're trying to add already exists in the master list. In such a case, simply select the city to avoid duplicate entries. If the city does not appear after waiting, you can type the name of the city in the field to add it to the city master list. For upcoming contacts from the same city, you can then select it from the dropdown.Following this practice correctly will help avoid typing mistakes and ensure accurate city-wise reporting.
Adding Additional Information
In this section, you can include additional details and context related to the contact. Follow thesesteps to input the Additional Information: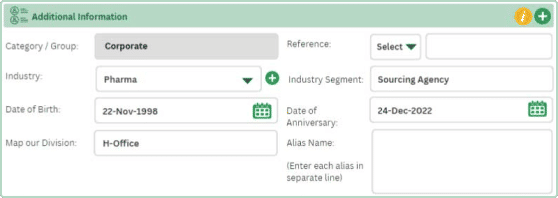
-
- Category / Group: Select the appropriate category or group to which the contact belongs. This helps in organizing and grouping your contacts for various purposes.
- Reference:: Indicate how you came to know about this contact by choosing from the dropdown options. Depending on your selection, further choices may appear for you to specify the source in more detail. For example, if you select “Activities / Campaigns ,” you can then specify the campaign name or activity that led to this contact. If you select Contact / Raw Contact or Employee you can specify the individual.
- Industry:: Specify the industry to which the contact’s belongs. This information helps in segmenting and targeting contacts effectively.
- Industry Segment: If applicable, choose a specific segment within the selected industry to further categorize the contact.
- Date of Birth: If known, input the contact’s date of birth. This can be useful for personalized communication or recognizing special occasions.
- Date of Anniversary: If relevant, provide the date of the contact’s anniversary. This is particularly helpful for maintaining strong client relationships.
- Map our Division: If your contact is associated with a specific division within your company ororganization, map it here to make the contact information accessible to a particular business division.
- Alias Name: If the contact is commonly known by a different name or alias, you can enter it here and you can also search the contact by Alias Name at various places into the system.
By following these steps, you can add valuable context and details to your contacts in H-Office Contact Center, making it easier to manage and engage with them effectively.
Remember
- If you are unable to find a relevant option in any dropdown, you can get in touch with the system administrator to add a new option.
- You can add multiple alias names if required, separated by pressing Enter. You can also search and retrieve contacts by searching for them using their aliases in various places.
Adding Communication & Social Media Details
In this section, you can include additional contact information and social media profiles for yourcontacts. Follow the steps below to input Communication & Social Media Details: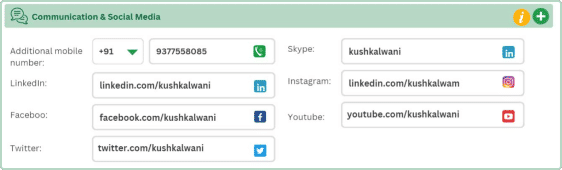
- Additional Mobile Number: If your contact has an alternate mobile number, you can enter it here.This can be useful for ensuring multiple contact channels.
- Skype: Input the Skype ID of the contact if applicable. Skype is a popular platform for video calls and instant messaging.
- LinkedIn: Provide the LinkedIn profile link of the contact. This allows you to connect and engage professionally on LinkedIn.
- Instagram: If your contact has an Instagram presence, enter their Instagram username or profile link.
- Facebook: Include the Facebook profile link or username of the contact. Facebook is a versatile platform for personal and business connections.
- YouTube: If your contact is associated with a YouTube channel, provide the channel’s link.
- Twitter: Input the Twitter handle or profile link of the contact.
By following these steps, you can enrich your contact records with multiple communication channels and social media profiles. This allows you to engage with your contacts effectively across various platforms and channels.
Adding Statutory Details
In this section, you can input important statutory and regulatory information for your contacts. Follow these steps to enter Statutory Details:
- PAN Number: Enter the Permanent Account Number (PAN) of the contact if applicable. PAN is acrucial identifier for tax purposes.
- Aadhar Number: Input the Aadhar number of the contact if it’s relevant. Aadhar is a unique identification number issued by the Indian government.
- GST Registration Type: Specify the registration type associated with the contact, such as Regular,Consumer, Composition & Unregistered.
- Regular: This registration type typically applies to businesses that are registered under Goods and Services Tax (GST) as regular taxpayers. They are required to file regular GST returns and pay taxes accordingly.
- Consumer: Consumer registration is for individuals or entities that purchase goods or services but are not required to collect or remit GST. They are primarily consumers rather than businesses.
- Composition: Composition registration is for small businesses with a turnover below a certain threshold. Under this scheme, they pay GST at a fixed rate on their turnover and are subject to simplified compliance requirements. They cannot collect GST from customers.
- Unregistered: Consumer registration is for individuals or entities that purchase goods or services but are not required to collect or remit GST. They are primarily consumers rather than businesses.
- GST / ARN Number: If applicable, provide the GST or ARN number associated with the contact.
- SEZ Type: Select the Special Economic Zone (SEZ) type relevant to the contact if applicable.
- CIN Number: Enter the Corporate Identification Number (CIN) if the contact represents a registered company.
- Transporter ID: Include the Transporter ID if the contact is associated with transportation services.
- TDS Applicability: This category includes individuals or entities that are not registered under GST. They are not required to collect or remit GST on their supplies. It typically applies to small businesses or individuals who fall below the GST registration threshold.
By following these steps, you can enrich your contact records with multiple communication channels and social media profiles. This allows you to engage with your contacts effectively across various platforms and channels.
Adding Sales & Purchase Settings
In this section, you can configure specific settings related to sales and purchases for your contacts.These settings can help streamline your billing and transaction processes. Follow these steps to input Sales & Purchase Settings:
- Credit Limit Amount: Specify the maximum credit limit amount for the contact. This defines the amount up to which the contact can make purchases on credit.
- Credit Limit Days: Indicate the number of days within which payment is expected from the contact after a purchase on credit.
- Default Discount Applicable(%): Set the default discount percentage applicable to this contact’s transactions.
- Apply Default Pricelist: Select the default pricelist to apply to this contact’s purchases.
- Sales / Purchase Group for Billing: Assign the contact to a specific sales or purchase group for billing purposes. This can help in categorizing and managing transactions.
- Class: If applicable, assign a class to apply a specific class based pricelist for the contact.
- Default Invoice Type: Choose the default invoice type, such as “Sales Invoice” or “Service Invoice” for transactions with this contact.
- Lock for Sales: Specify whether the contact should be locked for sales transactions. Locking can prevent accidental sales to certain contacts.
- Annual Revenue: Enter the contact’s annual revenue or income if available. This information can be useful for categorizing and prioritizing contacts.
By configuring these Sales & Purchase Settings, you can tailor your interactions and transactions with each contact according to their specific billing and purchase requirements. This helps in efficient financial management and reporting.
Remember
- If you are unable to find a relevant option in any dropdown, you can get in touch with the systemadministrator to add a new option.
Remember
- If you are unable to find a relevant option in any dropdown, you can get in touch with the systemadministrator to add a new option.
Adding Contact Settings
In this section, you can configure various contact-specific settings to tailor their experience. Follow these steps to input Contact Settings:
- Default Time Zone: Select the default time zone for this contact. This ensures that time-related transactions and notifications are synchronized with the contact’s time zone.
- Default Currency: Choose the default currency for transactions with this contact. All financial transactions will be conducted in this currency unless specified otherwise.
- Send System Notifications: Specify how the contact should receive system notifications. Options include Email, SMS, both Email and SMS, or None if they prefer not to receive notifications.
- Enable Client Login: Decide whether the contact should have access to a client portal. Enabling this feature allows the contact to access various client portal add-ons available with H-Office.
By configuring these Contact Settings, you can create a personalized experience for each contact,ensuring that they receive information and transactions in their preferred time zone, currency, and notification format. Additionally, enabling client login provides self-service options for the contact to manage their interactions with your organization more effectively.
Remember
- If you come across a section or fields that are not mentioned above, they may be custom fields created in your account. Custom fields are primarily used for capturing additional information. To add relevant information to them or for any assistance related to custom fields, please contact the system administrator.
Access the Contact Center
- Navigate to the Contacts Tab located next to the Dashboard in the top navigation menu.
- Once you’re on the Contacts page, click on the “Import” button located next to the “Add New Contact” button. In the dropdown menu, select the option “Import Contacts from XLS” to begin the process of importing contacts from a spreadsheet to H-Office.

Download Contact Import Sheet Template
Download an import template from the right-hand side of the screen by clicking on the ‘Click Here’ button.
Preparing Your Contact Import Template Sheet
Before importing your contacts into H-Office, it’s essential to have your contact data organized in the correct format within an import template sheet. This section will guide you through the process of preparing your template sheet, ensuring a smooth and successful contact import.
- Division: Enter the company Division name. You can add multiple divisions by separating them with commas (e.g., hoffice, corpteaser). Ensure that the divisions you enter already exist in H-Office.
- Title: Enter the titles of the Contact. If left blank, it will consider the default prefix from the system.Default options include M/S, Mr., Mrs., Miss, Ms., Dr., Prof., CA., Ar., ID, Er., Dr., Prof., Shri, Smt.
- Name: Provide the full name of the contact in the ” Name Surname” format.
- Alias names: Enter alias names for the contact, separated by commas.
- Type Of Contact: Specify the type of contact, which can be Customer, Vendor, Both, or Other. Note that the type of contact is case-insensitive but should be spelled correctly.
- Default price list: Write the default price name based on the price list master (e.g., Bulk Buyer Price).
- Email Address: Enter the single email address of the contact (e.g.,email@domain.com).
- Mobile Number: Provide a single mobile number of 10-digits without adding a +county code to the field (e.g., 9327058088). It will be fetched automatically from the country column value.
- Mobile Number1: Add an additional mobile number to this field, same as above.
- Office Phone: Enter a single office phone number to this field by adding an STD code(e.g.,07926862513), No need to add country code (ISD code) to this field, It will be fetched automatically from the country column value.
- Office Phone1: Add an additional office phone number to this field, same as above.
- Type Of Address: Specify the type of address, such as Office Address, Factory Address, or Godown Address.
- Address 1: Enter the address line 1 of the first address (e.g., 5, Vasupujya Bungalows).
- Address 2: Provide the address line 2 of the first address (e.g., Opp. Fun Republic Cinema, Nr. JainDerasar).
- Area: Mention the area of the address (e.g., Satellite).
- District: Specify the district of the address (e.g., Ahmedabad).
- City: Indicate the city of the address (e.g., Ahmedabad).
- State: Enter the state of the address. Ensure that the state name is in capital letters (e.g.,GUJARAT).
- Country: Provide the country name of the address (e.g., India).
- Zip / Pin Code: Enter the zip code of the address (e.g., 380015).
- Industry: Enter the single industry of the contact (e.g., Finance).
- Reference: Specify the contact reference, indicating how you know the contact (e.g., name of the contact reference, like Ronny).
- Annual Revenue: Enter the annual revenue of the contact in numeric format without adding spaces or commas(e.g., 900000).
- Privacy: If it’s a public contact, leave this field blank. If it’s private, enter the employee codes of those employees separated by commas to whom it should be visible (e.g., E01, E02). If you enter the wrong employee code, it will only consider the correct code. If all codes are incorrect, it will be considered public.
- Category: Enter a single category name or multiple categories separated by commas (e.g.,Insurance, Mutual Funds).
- Designation: Specify the designation of the contact (e.g., Manager, Designer, etc.).
- Relation: This field is getting used to map associated contact and it Indicate the relation type with the contact associated contact(e.g., Employer, Company, etc.).
- Relation To: Specify the contact with whom the relationship to be mapped with(e.g., M/S HorusTech Solutions Pvt Ltd).
- Other Number: Enter an additional phone number here (e.g., 7926862513).
- Website: Enter the website address of the contact (e.g.,www.hofficecrm.com, www.corpteaser.com).
- Skype ID: Specify a single Skype ID (e.g., support.horus).
- PAN Number: Enter the PAN number of the contact (e.g., APN12345509).
- VAT Number: Include the VAT number of the contact, especially if the contact type is a company(e.g., VAT123456789).
- CST Number: Include the CST number of the contact, especially if the contact type is a company(e.g., CST987654321).
- ST Number: Include the ST number of the contact, especially if the contact type is a company (e.g.,ST555555555).
- GST Number: Include the GST number of the contact, especially if the contact type is a company(e.g., GSTIN12345ABCD).
- Adhar Number: Include the Adhar Card Number number of the contact (e.g., 1234 5678 9012).
- TAN Number: Include the TAN number of the contact, especially if the contact type is a company(e.g., TAN12345A).
- Date Of Birth: Enter the date of birth of the contact in the format YYYY-MM-DD (e.g., 1980-09-25).
- Anniversary Date: If applicable, enter the anniversary date of the contact (e.g., 2005-07-20).
- Class Name: The “Class Name” field is used to assign a specific discount structure or pricing class to a contact. When you enter a class name here, it determines the discount or pricing rules that will be applied to this contact. For example, you can have different classes like “Gold,” “Silver,” or “Bronze,”each with its own pricing or discount structure.
- Class Code: The “Class Code” field is used in conjunction with the “Class Name” to further define and identify the specific class for the contact.
- GST Register Type: Specify the GST registration type as 1 (Regular), 2 (Consumer), 3(Composition), or 4 (Unregistered).
- GST Member Type: Indicate the GST member type as D (Deemed export), G (Government entity), orS (SEZ).
- Gender: Assign 1 for Male or 2 for Female.
- Date Of Death: If applicable, enter the date of death of the contact in YYYY-MM-DD format (e.g.,1980-09-25).
- Transporter ID: Provide the Transporter ID if relevant.
- Business Contact Type: Specify 1 for Partner or 2 for End User.
- Currency: Specify the currency by their three-letter acronym or abbreviation. The two letters at the start refer to the name of the country and the third is the currency. E.g. AUD is the Australian Dollar.
- Social Media Links: You can provide links to the contact’s social media profiles such as Facebook,LinkedIn, Instagram, YouTube & Twitter.
- Remarks: Add any additional remarks or notes about the contact.
Remember
- You can import contacts in XLS format only.
- Please avoid formatting the spreadsheet to ensure a smooth import.
- For a seamless import process, it's advisable not to upload more than 1000 contacts at a time.
- Red marked columns are the mandatory columns.
- Configured required constraints, such as making the email compulsory for certain contact types(e.g., Company or Individual with titles like Mr. or Mrs.), will not be enforced during the import process.
Uploading Contact Sheet to H-Office
Go to the page where you downloaded the contact sheet template. Locate the file upload section on the page, click the “Choose File” button to select the contact sheet file (in XLS format) that you’ve prepared on your computer. Once you’ve selected the file, click the “Start Import” button. This action initiates the import process. H-Office will begin processing the data from your contact sheet.
Column Mapping in H-Office Contact Import
After you’ve uploaded your contact sheet and initiated the import process, you will be directed to the mapping page. On this page, you’ll see an H-Office contact field on the left hand side and it provides dropdown for the column selection from your contact sheet on the right-hand side. Begin by reviewing the columns, click on the dropdown menus in the right-hand column if you want to change the mapping for any field and select the drop down value for the column that corresponds to the data. Once you’ve completed the column mapping for all the relevant columns in your contact sheet and click on the “Next” button to proceed button at the button to proceed further.
Review and Confirm Contact Import in H-Office
Now H-Office will present you with a summary screen before finalizing the contact import. This screen is crucial for ensuring the accuracy of your data and allows you to address any issues before proceeding.Here’s how to review and confirm your contact import: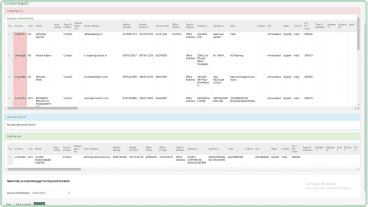
-
- Review Invalid and Duplicate Records: H-Office will identify and display any records in your import sheet that it cannot process due to errors or duplicates. Carefully review the sections that contain invalid and duplicate records to understand the issues.
- Valid Record Details and Count: Below the invalid and duplicate record sections, you’ll find details of the valid records that are ready for import. Check the count to ensure it matches your expectations.
- Map “Key Account Manager” (Optional): If you want to change “Key Account Manager” for all contacts in this import, you may have the option to map it here. Use the dropdown menu to select the appropriate account manager if needed.
- Submit: Once you’ve reviewed all sections and are satisfied with the import details, locate the “Submit” button. Click on this button to initiate the contact import process.
By following these steps, you can confidently review and confirm your contact import in H-Office, ensuring that valid records are successfully imported, and any issues are addressed before the import process begins.
Import Summary
After the completion of the contact import process, H-Office will provide you with an import summary screen. This summary screen offers valuable insights into the outcome of your import, allowing you to assess the success of the operation. Here’s what you can expect to see:
-
- Total Records In Sheet: This number represents the total count of records present in the import sheet you uploaded.
- New Records Created: This figure indicates the number of new contact records that were successfully created in the system during the import process. These are contacts that did not exist in the system previously.
- Records Updated: In some cases, you may be updating existing contact records rather than creating entirely new ones. This count reflects the number of contact records that were updated with new information during the import.
- Valid Records: This number represents the count of records that met all criteria for successful import.These records are now a part of your H-Office database.
- Invalid Records: These are records that could not be imported due to various issues such as missing or incorrect information. Review and address the errors associated with these records as needed.
- Duplicate Records: If there were duplicate records in your import sheet, this count indicates how many duplicates were identified and managed during the import process. Duplicate records may have been merged or otherwise handled based on your system settings.
By reviewing this import summary, you can quickly assess the overall success of your contact import,identify any issues that need attention, and ensure that your H-Office database is accurate and up to date.
Remember
- Once your contact sheet is successfully imported, it will be automatically downloaded to yourcomputer. This sheet will contain all the records that were imported successfully, along with theirrespective contact codes. You can utilize this sheet to further import associated contacts withthese newly imported contacts. Importing multiple associated contacts with a particular processis an independent import process in H-Office.
- Let's say you first import organization-type contacts, such as companies or institutions. Once thisimport is completed, you may want to proceed to import their associated employees orrepresentatives. In this case, you can use the downloaded sheet from the organization import toefficiently link and import their associated contacts, making the process seamless and organized.